What’s longer? The trek itself, or your Mount Kilimanjaro gear list?
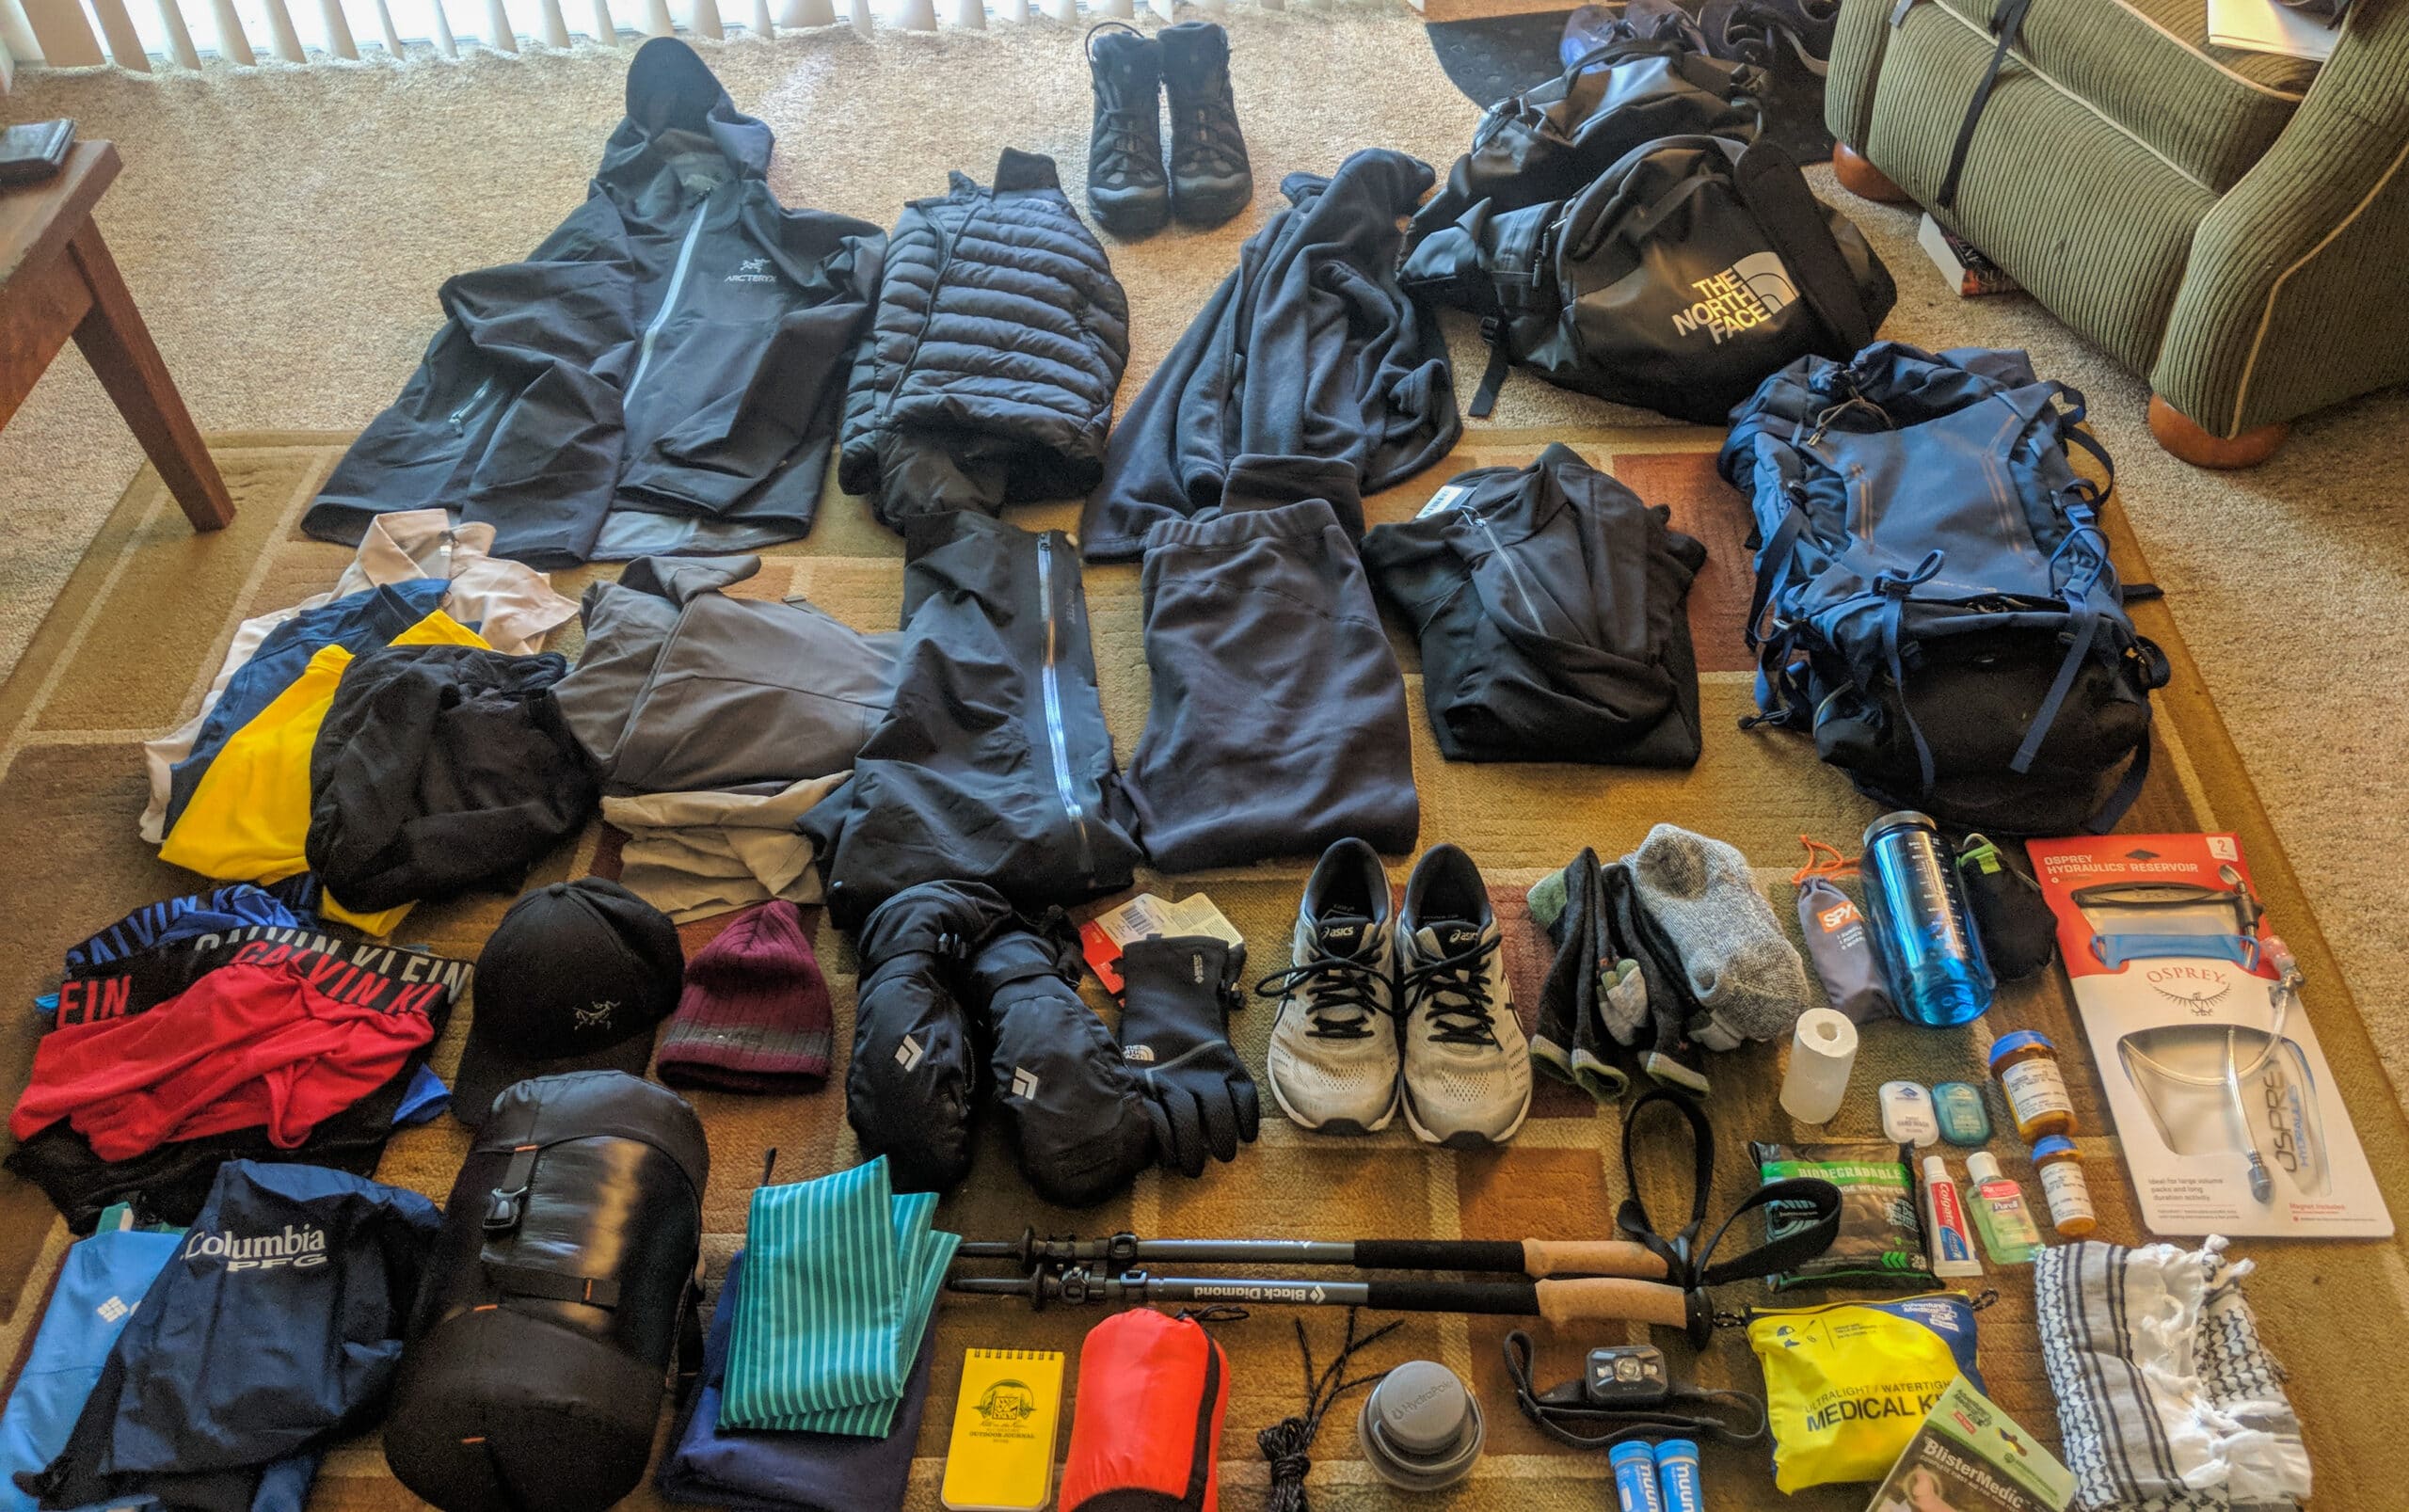
So you’ve decided to conquer Africa’s highest mountain. Having done this myself, once the logistics are all figured out, you’re going to begin amassing a pile of gear, the likes of which you’ve probably never seen for a single trip.
Any Kilimanjaro gear list will appear daunting at first glance. Especially if you’re new to this sort of adventure. But don’t let that get you down. In fact, please allow me to help with a list of my own.
My Kilimanjaro Gear list was assembled by combining several others that I read online, as well as by following the recommendations of those who went before me.
What? By combining other lists? So why should you bother reading mine?!
Well, on those other lists I’ve read, most don’t tell you what the author thought about the gear or why they chose it. Why do they prefer this over that? Or even what said gear’s function is.
Their Kilimanjaro gear list is usually just a dry list with none of the love. I mean come on, wouldn’t you like to know if the gloves you’re reading about would make suitable kitten mittens? Or when you’ll be using a… uhhh… pee bottle?
So without further ado, I give you my Mount Kilimanjaro Gear List.
Download: MOUNT KILIMANJARO GEAR LIST PDFMount Kilimanjaro Gear List
Table of Contents
Technical Clothing
Water Proof Jacket (1)
Arc’teryx Zeta SL Jacket. Waterproof, windproof, bombproof, and breathable. This Super Light (SL) Gore-Tex jacket is the gold standard for keeping you dry. I did a ton of research on waterproof hardshells and the Zeta SL won the prize.
It never rained but the wind on summit night was so relentless that the storm hood really saved me from a ton of unnecessary misery.
Insulated Jacket (1)
Arc’teryx Cerium LT Jacket With 850 down fill power, this is a warm jacket. Don’t confuse it though. It’s not a parka. While you can wear this on its own, and look great while doing it, these jackets work best in conjunction with a hard-shell over top.
They’re also built to last. I’ve used this jacket for four winters in a row now and it’s still fluffy with no feather loss. And speaking of feathers, Arc’teryx down is ethically sourced.
Fleece Jacket (1)
Columbia Steens Mountain 2.0 Fleece Jacket Light and warm enough for most of the climb, this fleece fits well and works for layering.
I didn’t invest a lot in a fleece jacket as they’re all pretty much the same. Just make sure it’s full zip and has zippered pockets. If something valuable falls out of your pocket, the odds of you seeing it again are slim.
Long-sleeved shirts (3)
Columbia Men’s Silver Ridge Shirt (2) The most important thing here is that these shirts are moisture-wicking. Leave the cotton at home. It has no place on this mountain.
I also burn easy and these have omni-shade technology which acts as a sunscreen in spite of how light they are.
Eddie Bauer Men’s Resolution (1) I also took this performance shirt which brought me up to the recommended three long-sleeve shirts. It can be worn on its own but is also snug enough for comfortable layering. These shirts are pretty much all the same so no need to split hairs.
Short-sleeved Shirts (2)
The North Face Men’s HyperLayer FD These shirts are pretty solid. I generally prefer a more athletic cut, but I had no complaints with these. I went with the bright golden one because for some reason I felt like I wouldn’t already stand out enough walking through downtown Moshi.
Again, leave the cotton at home. Unless you brought a couple of funny shirts to give the porters. In that case, leave them at the basecamp (preferable) or make sure they’re sealed up in a waterproof container.
Hiking Pants (2)
Columbia Men’s Silver Ridge Cargo Pants They fit me perfectly, are lightweight, moisture-wicking, dry fast, and offer Omni-Shade sun protection. The one velcro and one zip cargo pockets strike a perfect balance.
You’ll wear these on the first few days before they’re replaced by something heavier. I could have managed with only one pair, but pants will get the dirtiest of everything you wear and they were light enough.
Plus these flatter your butt. Uhhh
Soft Shell Pants (1)
REI Co-op Activator V2 Soft-Shell Pants These are heavier hiking pants that will give you the little extra warmth you’re going to need. Their stretch makes sure that they remain comfortable to wear while scrambling.
Waterproof Pants (1)
Outdoor Research Foray Pants These Gore-Tex pants are expensive but they’re top of the line and you get what you pay for. They’re light and breathable while still keeping all of the bad stuff out.
Then there’s the full-zip leg. Have you ever tried to pull a pair of pants on while wearing boots? It’s not happening. So now picture if you may, an unexpected downpour in near-freezing temperatures. Do you want to take your boots off in that?
Thankfully I didn’t need to wear them, but I took plenty of comfort in knowing that I had them, unlike my Aussie counterparts with their rented ponchos that only went down to the knee. Sorry, not sorry… How ill-prepared they were has become a running joke to me.
Fleece Pants (1)
REI Co-op Teton Fleece Pants Soft and warm, these pants are great for wearing while lounging in your tent. I wore them to sleep for more than one night but that’s not why I got them.
While speaking with an “expert” who has allegedly climbed Kilimanjaro before, he told me they would be overkill for summit night and that I would be fine in my softshell pants and base layers. “If you get cold just put on your rain pants.”
I don’t know when the hell he chose to climb Mount Kilimanjaro… perhaps during a summer heatwave because I wouldn’t have finished without these. I would have frozen and been dragged down with exposure. It was so damn cold. Having these pants saved me on summit night.
Long Underwear (1)
The North Face Cold Gear I brought one full set, top and bottom of these. They were the warmest set available by The North Face and I was completely satisfied with them. The sizing is a bit difficult to nail down so it might take a try or two.
The biggest thing to remember is that you want them to be a moisture-wicking material. Again, no cotton.
Underwear (4)
I brought four pairs of my regular underwear. Just be sure that they’re made of moisture-wicking material. I wear Calvin Klein boxer briefs. Don’t blush.
Footwear
Hiking Boots (1)
Salomon Quest Prime GTX Hiking Boot These Gore-Tex boots are as comfortable as can be, lightweight, and still warm enough to keep your feet toasty. (Extra thick socks are still needed for summit night.) I like these boots so much that I am still using them for other activities. I even wear them at work.
You want them to be warm and waterproof so the Gore-Tex in them is heavenly. Obviously, it will keep them from getting wet from rain, but during the descent, your first mile or so is down a very steep, sandy dirt decline.
There’s a lot of foot shuffling. I was infinitely pleased when I took them off and my feet were still clean. You know what I’m talking about, right? When you’re trudging through dirt in sneakers and later find it all in between your toes. None of that happening with Gore-Tex!
If you’re looking for something a little warmer and a little stiffer, the Salomon Men’s Quest 4D 3 GTX Backpacking Boots are the way to go. I considered these but opted for the Quest Prime since I wouldn’t be carrying much gear. Backpacking boots are designed for carrying a heavier load.
Whatever boots you do end up with, be sure that they are thoroughly broken in. Brand new boots would kill your feet. Also, be sure that they’re waterproof and that they fit well. Wet boots will never dry at altitude and any hot spots will lead to blisters in short order.
Camp Shoes (1)
Sneakers/crocs/flip flops These will be worn around camp when the day’s hiking is all done. Trust me, you won’t want to wear only your boots for over a week straight.
It can really be any of the three. Initially, I was going to use flip-flops but I changed to a light pair of sneakers. The reason for this was that it gets extremely cold once the sun goes down.
Also, keep it to only one pair. My favorite Aussie tried bringing both sneakers and sandals with a gigantic wooden heel/sole. It made my head hurt when I saw them.
They only came out when they found her bag was twenty pounds overweight. No need for a four-pound pair of shoes. Or a two-inch-thick hardcover book. Or two hairbrushes?? I could continue…
Socks (4-5)
Darn Tough Merino Wool Socks and one pair of the Smart Wool Mountaineering Extra Heavy Socks Darn Tough socks are great. I own about ten pairs in different cuts. They come with a lifetime warranty, are warm, moisture-wicking, and are naturally antimicrobial and antibacterial to help keep them from smelling.
I brought four pairs of the Darn Tough hiker socks and one pair of the extra heavy. The extra heavy socks I only wore on summit night together with the Fox River X-Static Liner Socks.
It gets extremely cold on summit night and you want to keep your toes warm. I was fine with only these but some others put chemical toe warmers in their boots as well.
One of the most important things to remember on any outdoor adventure is to take care of your feet.
Gaiters (1)
Black Diamond Apex Gaiters Gaiters are designed to keep pebbles, snow, water, and other debris from getting into your boots while you hike. The Solomon boots I wear are a mid-height boot so gaiters are a little less necessary for me, but if you wear something with a lower cut you may want them.
Full disclosure, I didn’t wear my gaiters at all. I never got anything in my boots and didn’t feel the need, but this doesn’t mean don’t bring them. I saw more than one person dumping things out of their boots, and I definitely would have worn them if there was snow.
Later, I gave them to a porter as I couldn’t see myself using them anytime soon.
Headwear
Ball Cap (1)
Arc’Teryx Bird Cap You’re going to want a brimmed hat to help protect you from the sun. Remember, you’re near the equator and there is no shade after you break through the tree line.
The best marker I can give of the sun’s strength on Mount Kilimanjaro is that my hat was almost brand new when we started. By the time we got back down to the exit gate, it had faded and was brown and orangish in several spots.
The sun might not feel strong since it’s cold, but it is.
Some people opt for full brim hats or those with an attached neck shield as well but I just used sunscreen and my shemagh to protect the back of my neck.
Knit Hat (1)
Dakine Beanie I can’t link it directly because they’ve long since discontinued the model, but I wore a Dakine Beanie. It is wool on the outside with a synthetic inner that passes around the ears.
Yes, there are far warmer hats out there, and you may want something with a bit more oomph, but I’ve worn this hat in multiple winters and knew that it would be enough for me.
I did have to wear my sunglasses outside of my hat because they were letting cold air slip in. It looked stupid, but don’t judge me like my brother did. He doesn’t even cover his ears with his hats while snowboarding.
Face Shield (1)
You only need one but I brought two – sorta. I brought a standard neck gaiter made by Salt Armor which I wore on summit night. It isn’t heavy and I mostly just used it to protect myself from a bit of the wind. These are made out of polyester.
The other thing I brought was a Shemagh. I bring one of these everywhere I travel as they serve a litany of purposes. On this trek I mostly wore it draped around my neck for sun protection. Then I doubled it around my neck gaiter on summit night for a little extra warmth.
Yes, they are made of cotton, but they’re so light and thin that I wasn’t concerned with it getting wet. This was the only cotton I brought on the mountain. It’s not like I wore a cotton hoodie, sweatshirt, t-shirt, sweatpants, and socks. Right? ARGHH!!
Neither of these are heavy or warm on their own so if you’re looking for something to keep you toasty, I’d recommend something like the Outdoor Research Option Balaclava. I almost bought one.
Handwear
Gloves – Warm (1)
Black Diamond Mercury Mitts Waterproof mittens with a removable liner that sport a handy trigger figure. You can use them with or without the trigger finger, but if you want to do something like take a picture without taking your hands out of your gloves, simply pull the liners out of the shell and you’ll have one free finger that’s still covered. This comes in handy when it’s below freezing and super windy.
I only wore them on summit night but these were nice and warm.
I know some people like full glove liners inside of mittens but I prefer floating fingers so they can share warmth and you can still make a solid fist in case you need to fight someone.
Whatever you get, be sure that they’re waterproof. Wet gloves high on a cold mountain can spell disaster.
*The removable liners also help them dry in the event that liquid finds its way inside the waterproof lining.*
Sorry, I know this is what you were waiting for, but unfortunately, they’re too large for use as kitten mittens.
Gloves – Light (1)
The North Face Gore CloseFit Tricot A lighter soft-shell glove mostly designed as a wind blocker, these gloves are close-fitting to allow for good hand articulation.
Don’t expect them to be warm because they’re not. It says right on the packaging that they aren’t rated for deep cold but for some reason people still complain about them not being warm in reviews?
I wore these every day except for Day 1 and on summit night.
While researching gloves for Kilimanjaro, I saw some woman posted in a forum that her “husband wore only light liners for the entire trek so you’d be fine with something similar because it’s not bad…”
That’s horrible advice! Don’t do that!
He could have made it by for any number of reasons. Maybe they caught a break and had warmer than average conditions, there was no wind, no rain, her husband has an above-average tolerance for cold, or maybe his hands were miserably cold the entire climb but he didn’t want to let on about it.
Again, just because something is warm enough for me, doesn’t mean that it will be for you! Hope for the best, but plan for the worst. If I listened to her advice and tried using only these on summit night I’d have gotten frostbite.
Hand Warmers (X)
While not necessary, hand or even toe warmers can be a great comfort to have. I did use a pack for my hands during summit night, but it was so cold out that they never fully heated up.
Another advantage of a true mitten is that you can slide one of these inside and hold it in your hand for additional warmth. Sure, you can do that with a glove but your fingers are getting left out.
I only brought one pack of these. Just remember, leave no trace. However many you bring, if they go up the mountain, they need to leave the mountain. Don’t drop them on the ground once they’re spent.
Equipment
Sleeping Bag (1)
Hyke & Byke Snowmass 0 Degree F You should have at least a zero-degree bag on Kilimanjaro and H&B makes one that’s warm and light and with great compression. Plus it won’t break the bank. For this price point, you’re not likely to find anything better. This was more of a budget purchase, but I tested it while camping in Europe so I knew that it would keep me warm.
While I was pleasantly surprised at how warm it was, I also brought the Sea to Summit sleeping bag liner as a precaution. I never needed it.
A few nights I was too hot in this bag but I’ve heard stories of people sleeping in their full hiking clothes, jackets included, and on top of that, stuffing extra clothing inside their sleeping bag because they were so cold.
In the future, when I climb Mount Rainier, I’ll be upgrading to the Mountain Hardwear Phantom Sleeping Bag. They also make the more budget-friendly Mountain Hardwear Bishop Pass 0 Sleeping Bag.
If you’re really a baller, they make a Gore-Tex version of both bags.
Trekking Poles (1)
Black Diamond Alpine Carbon Cork Trekking Poles These collapsible poles are a highly versatile, fully adjustable four-season pole that are built with premium materials. They’ll handle alpine backpacking routes, mid-winter expeditions, and far-flung treks with ease. They even accept 100mm baskets if you’re ever trekking through deep snow.
Do you love your knees? Consider investing in trekking poles. These can be a lifesaver in more ways than one. Not only do they help with the impact on your joints (especially during a steep descent) but they’ll help save you if you slip. I have avoided a few falls because of these.
They’re also great if you ever feel the need to ride the pony.
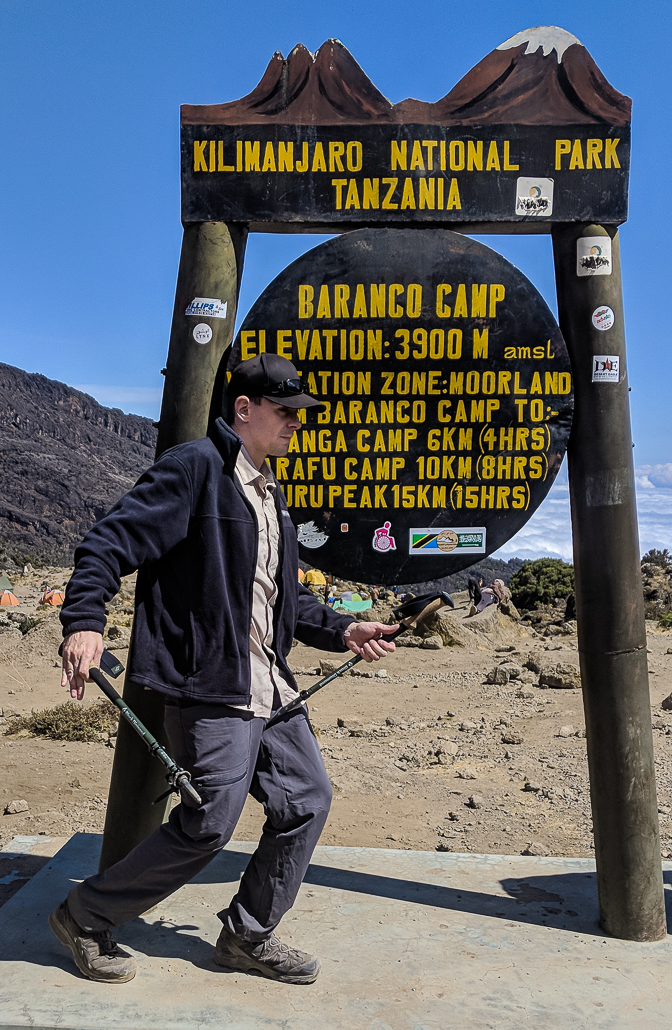
Baranco Camp.
Hit it, hit it, hit it, hit it, get it, get it, get it.
Duffel Bag (1)
The North Face Base Camp Duffel 95L I did a ton of research while trying to choose a duffel bag for Kilimanjaro. And when I say a ton, I’m not talking hours. I mean days. I watched every video, read every article, and visited every store that sold duffels. The North Face Base Camp was the king.
This is where your clothing and nonessential gear will be stored. It’s then carried by a porter.
One of my favorite things about it is that it has an extra zippered compartment that’s large enough for your camp sneakers. This keeps everything else from getting dusty.
It’s not waterproof due to untaped zippers but the material is coated to offer good resistance. Waterproofing isn’t necessary though because your porter will carry it inside of a tarp bag.
90 liters is the standard size recommendation but this came in 95 as a size large. You won’t notice the extra size because it won’t be filled to capacity since there is a strict weight limit for your bag of thirty-three pounds (15kg).
If you follow this packing guide you should come in well under the weight limit.
Day Pack (1)
Osprey Kestrel 48L This will be your personal day-to-day bag. It’s going to hold your water, snacks, additional layers you might need, and anything you don’t want breaking, like a camera.
Wearing this bag on your back is like wearing nothing at all. Osprey knows quality and the hip belt is the most comfortable I’ve ever worn.
While it is a bit larger than the recommended 35L capacity, I needed a little extra space as my bag had to fit any necessary camera equipment for a safari the following week. That included my 100-400mm telephoto lens which weighs over 3 pounds. Oof.
I cover this more in-depth in my main Climbing Mount Kilimanjaro post, but anything you don’t want to risk getting stolen needs to go with you.
A smaller, 36-liter option called the Stratos exists. There is also the Osprey Kyte which is the female version of the 46L Kestrel.
Headlamp and Extra Batteries (1)
Black Diamond Storm Headlamp Powerful, waterproof, and dustproof.
On Kilimanjaro, this headlamp was more powerful than all the others in my group combined. When I was at the front of the line, my guide turned his off almost as soon as we started walking.
I have seen some people complain about battery life, but I have yet to have any issues and find my expectations to match with the Outdoor Gear Lab test results.
Just to be safe I put in fresh batteries for summit night and they lasted well beyond that. Just be sure to use good batteries as there is a measurable difference in strength between high and low end.
Inflatable Pillow (1)
Nemo Fillo Elite Pillow This is an optional item, more for your personal comfort. Look… they’re light, take up minimal space, and will help you sleep better on an unforgiving mountain.
I’ve tried the bundle of clothes in the past which always leaves my ear hurting since I’m a side sleeper. I’ve also done the inflated dry sack wrapped in a t-shirt. That’s like sleeping on a balloon with no give.
If I didn’t have this, it wouldn’t have been the end of the world, but sleeping at high altitudes gets progressively more difficult. May as well help yourself and be comfortable.
Accessories
Polarized Sunglasses (1)
Spy Cooper You’re going to want good sunglasses. Not the cheap kind you find at Walmart. I prefer polarized lenses. Different than regular lenses, they reduce glare from surfaces such as water, snow, and glass.
The glare you’ll be experiencing on Kilimanjaro is off of snow, and while there probably won’t be much of it when you climb, it does make appearances.
Don’t let anyone tell you polarized lenses are overkill. Have you ever had your eyes burned from glare? That’s not something you want to experience.
I’m a big fan of Spy sunglasses and own a few pairs. I opted to bring the Coopers since they’re a wrap. Their Happy Lens technology is so good that I can literally feel my eyes relax when I put them on.
Water Bottles (1-2)
Nalgene Water Bottle 32oz. There are no single-use water bottles allowed on the mountain because humans suck and can’t be trusted to carry them out once empty. Though for some stupid reason you are given single-use bottles for lunch at the entrance gate…ugh.
You’ll be drinking at least 4-5 liters of water per day to help cope with the altitude and exertion so a Nalgene is the way to go. I recommend a wide mouth because it helps with adding powdered drink mixes should you so desire.
The water didn’t taste bad so I only added anything to mine a few times to break up the monotony.
Sippy Lid (1)
HydraPak Watergate Wide Mouth Splash Guard More of an optional comfort item, these flexible little guards fit in the top of wide-mouth Nalgene bottles.
They take up no space and weigh nothing. Yes, this sounds like a stupid item but they’ll keep you from spilling on yourself if you take a drink while walking or sitting in a bumpy car.
Water Bladder (1)
Osprey Hydraulics Reservoir 2-3 liters. This is just another means of carrying your drinking water. I went with the two-liter size because I wanted to keep my pack weight manageable as my camera gear was already heavy.
Combined with a Nalgene bottle, this gave me three liters per active hike. Then, what I drank before and after brought me into the 4-5 liter range for the day.
The main brands, Osprey, CamelBak, and Platypus are all pretty interchangeable. I chose Osprey since it was designed to fit in my daypack.
I never had any issues with leaking and it was easy to fill. When it’s new I recommend filling it with water and lemon juice and freezing it. Then thaw it out and it should remove the plastic taste that comes with a new bladder.
Pee Bottle (1)
Hydrapak Stash Flexible Bottle While not necessary, these are highly recommended. After the sun goes down at night it gets very cold outside and you may not want to leave your tent.
These bottles are nice because they collapse down to roughly the size of a hockey puck. Their one-liter capacity should be large enough for most.
While I brought one, I never used it. I’m a guy so going to the bathroom in the cold is a little more forgiving on me, and I can normally make it till morning.
Dry Bags
Sea to Summit Ultra-SIL Dry Sack Bring as many of these as you need, and in different sizes and colors. When you have multiple, the different colors will help you keep better track of where everything is. Toiletries in the red bag? Anything electronics-related like batteries and cords in blue? Copy.
I prefer dry bags to stuff sacks because they’re waterproof. You never know when it might rain. Or when you’re going for an unexpected swim.
In total I brought seven with me. Six smaller 1-2 liter bags, and one larger 4L which I used for dirty laundry.
If they’re holding something compressible, like laundry, sit on them while you roll up the end and they will compress well. Give them enough rolls and they’ll stay compressed.
Other
Camera
Sony A7III It’s really up to you if you want to bring a full-sized camera or not. Just remember that you’ll be carrying it in your day pack. Your duffel will be getting thrown around and dropped repeatedly by the porters so you can’t keep anything fragile in it.
I have since upgraded to the A7R iv, but on this trip, I brought my A7III and four lenses. While this is a lightweight (relatively speaking) mirrorless camera, it’s still a lot of gear to be trekking with. Particularly my Sony GM 100-400mm telephoto which weighs over three pounds.
Under normal circumstances, I wouldn’t have brought this lens but I needed it for my safari immediately after climbing Kilimanjaro and it’s far too expensive to have left at the lodge. They were very clear to not leave anything of value in your bags as they’re not responsible for anything that gets stolen. *important tip*
While I did get some incredible shots, it would have been far more practical to leave that lens or skip the full-size camera in favor of a GoPro…which I brought as well. Unfortunately, sometimes being a photographer isn’t about practicality.
Medication
Malaria medication. This stuff can be a little rough but it’s better than catching malaria! You will need a prescription for it.
The doctor told me that when I start taking it, if I throw up, I should immediately retake it.
While not nearly as harsh as the old stuff that was once given to the military, it does affect everyone differently. I was fine, but one of the girls in my group had dreams of being pushed off of a skyscraper by a goat. Yup.
Eventually, she quit taking it and immediately stopped being haunted by dream goats.
I also took this while in India and I’ve never had any side effects.
Acetazolamide This drug finds its way onto most Kilimanjaro gear lists where you’ll likely see it listed by the brand name Diamox. Diamox is used to treat many things, but you’ll be taking it to prevent Acute Mountain Sickness (Altitude Sickness).
You might be against taking it because you, “won’t need it!” I get it, you’re tough. Just take it anyway. It’s not an immediate cure so once AMS hits you, you’re toast. This is an expensive trip and you wouldn’t want to ruin it by getting sick.
I took it and I still had a minor brush with AMS. Thankfully, mine only lasted one night with another brief flare-up on my descent back down the mountain.
Opinions on dosage sizes vary. Consult your doctor and do your own research for your body. And by research I mean don’t listen to someone on an internet forum who climbed the mountain in 1992.
Pocket Knife or Multi-Tool
“Always carry a knife with you. Just in case there’s cheesecake, or you need to stab someone in the throat.“
General James Mattis
Spyderco Dragonfly 2 Salt Small, light, and razor-sharp, this is a great knife to use while doing pretty much anything. Usually, I carry the Spyderco Paramilitary 3 but when weight matters, I bring the Dragonfly.
While I do own one, I’m not a firm believer in heavy multi-tools such as the Leatherman (I own the Wave) while on trips like this. Instead, I look to a knife that’s small enough to never give me worry over local size limitations.
I haven’t see a knife on any other Kilimanjaro Gear List, so you may be doubting the wisdom of me putting a knife on mine. Well, I’ll have you know that I used it almost every day and let others borrow it on several occasions.
If you bring a knife, you’ll use it.
So yes, a knife belongs on a Kilimanjaro Gear List.
Sunscreen
Blue Lizard Sensitive Mineral Sunscreen There’s no shade on the mountain and you’re close to the equator so the sun can get harsh. Whatever you bring, make sure it has a decent amount of SPF.
I burn easily so I used to prefer the regular type, but mineral sunscreens are better for the environment. It’s for that reason that I’ve switched to mineral sunscreen. Just remember that you may need to reapply more often than with normal chemical-based sunscreens.
If you’re planning on going to Zanzibar after, you 100% need to have mineral sunscreen as regular sunscreens bleach the reef and harm fish.
Lip Balm (2)
Sun Bum Lip Balm, SPF 30 With an SPF of 30, this will protect your lips.
Since you’re going to be near the equator, this level of protection can be extra important. I’m sure you’ve all been at the beach before and gotten burnt lips at some point. I wouldn’t say it’s painful, but it’s not very pleasant.
Then let’s not forget the relentless wind you’ll experience on the mountain.
Everyone has lost their lip balm at some point. It’s for this reason that I recommend taking two. Better safe than sorry. But please do try to not lose it.
Toiletries
Sea to Summit biodegradable shampoo and hand soaps. Environmentally friendly and TSA compliant. Take two or three leaves from the pack, add a tiny bit of water, and you’re good to go.
These little soap packs are great. I now bring them on most trips that have any sort of rough or unknown element. Ever been in an “exotic” bathroom that has no soap? I’ve been there more times than I can count.
Toothbrush and toothpaste are standard travel fare.
I do floss daily (yes, really) and I almost brought it but if you’re considering this, think about it for a second. There are no trash bins, and it’s made of plastic.
The porters did have a community bag that they used to collect trash but it was always empty the following day. I don’t know what they did with it so it’s possible they were storing it in something else, but if not, it had to be going somewhere.
I brought a small travel-sized deodorant as well because I like smelling fresh. Remember, a good rule of thumb is if you can smell yourself even a little, others can smell you a lot. And don’t forget that you’ll most likely be sharing your tent. Don’t be the smelly kid in class.
Bug Spray
Strong bug spray with DEET can be a savior. Tanzania is a high-risk malaria country and you’re going to be both starting and finishing in a jungle.
I attract mosquitoes like I’m the last person on earth. In the past, I’ve been bitten north of thirty times in under two hours while the people with me remained untouched.
Sometimes it’s difficult being so delicious.
You’ll only need it while you’re in the jungle, so bring the smallest bottle you can find.
First Aid Kit
Adventure Medical Kits Ultralight/Watertight Light and basic, this is more than enough for any personal medical needs..
I brought the .7 size Medical Kit and made a few tweaks. I replaced the moleskin (for treating blisters), doubled the amount of medications, and added a few extra band-aids shaped like Jack-o’-lanterns.
Your guide will have a larger medical kit with him so don’t go nuts with this.
Anyone would be fine with something smaller like the .5 but I figured I’d be keeping this in the trunk of my car on a permanent basis after the trip.
It does now sit in my car and I’ve since added a set of medical shears, a quikclot trauma pack, an Israeli bandage, and a tourniquet. Should you ever choose to add these items, be sure to know how and when to use them.
I cut my knuckle one day and since my kit was in my duffel with the porters, my guide gave me a band-aid from the camp kit. He later asked me for a band-aid to replace the one he gave me. I gave him a bunch of pumpkins. He laughed.
Hand Sanitizer (3)
Purell Hand Sanitizer Any brand works.
Water for washing is scarce on the mountain so you’ll be wanting to use this before eating or after relieving yourself.
Be sure to bring enough of it. We each had one 2oz bottle and it wasn’t enough. We were going to great lengths to ration it. Two bottles would have been perfect, three is playing it safe.
Due to COVID, this has become a mandatory item.
Face Mask
Needed to slow the spread of COVID. Say what you want about them, for or against, it doesn’t matter. These are now mandatory. Leave your politics at home. Their country, their rules. Now whether or not they actually make you wear it once the trek starts, that’s a different story.
Biodegradable Wet Wipes
Surviveware Biodegradable Wet Wipes 100% biodegradable, wet wipes are part of how you stay clean on the mountain. I liked the multi-pack because it’s easier to store two packs of fifteen than one large pack of thirty-two.
You can’t shower, but that’s not an open invitation to stink.
One important thing to remember is to be sure your wipes are 100% biodegradable. There’s already enough trash on the mountain and regular wipes contain plastic.
Contrary to the loudly voiced beliefs of my favorite climbing partner, wipes that are plastic-free cannot break down into micro-plastics. Alchemy be damned.
Toilet Paper
My operator provided us with small rolls but I’d still bring one or two of your own just in case.
Snacks
Anything high calorie and easy to eat. The food on Kilimanjaro is absolutely horrible. Not to mention you’ll probably lose a fair amount of your appetite.
As someone who eats 3,000+ calories on a regular day, they definitely weren’t providing me with enough food, even if I hadn’t lost my appetite.
Comfort snacks will help you get some lost calories in. For candy, I brought snickers, peanut M&Ms, and chocolate bars which are a classic alpine staple. For protein, I brought Quest Bars and Builder Bars. Then, as a general snack, I brought a large bag of Cheez-Its. They were crushed to bits on day one so I ate them from a bowl with my camp spoon.
Drink Mix
The water didn’t taste bad to me so while not necessary, mixes are nice for breaking up the drink monotony. I brought a few flavors of Mio Liquid Water Enhancer.
Dissolvable tablets are popular as well. Just look for something with electrolytes as you will be exerting yourself.
Camp Spoon
Snow Peak Titanium Spork Light and easy to clean.
Do you need to bring one? No. The porters will provide you with cutlery for any meals. Should you bring one? Maybe. See bleow.
MREs/Backpacker Meals
Mountain House Pro-Pak Backpacker Meals Quick, easy, and delicious. These meals will keep you fed on the side of a mountain where food is both terrible and scarce. Just pick the ones with the most calories.
I brought one meal for each day I’d be on the mountain. These were a lifesaver. I can only imagine how much weight I’d have lost without them. For someone of my build, the amount of food they provided us with was akin to an eating disorder.
Get the Pro-Pak meals. They’re a little more expensive but their packaging is designed to not expand at altitude. Oh, and remember that “maybe” from just above? Well, you’ll largely be eating these on your own time. That’s when I used my camp spoon.
Documents
Passport
On any foreign trip, this is a no-brainer. I also recommend keeping a color photocopy of your information page, as well as a scanned copy saved to your phone.
Trip Receipts
Keep track of what you’ve paid and to who. During my trip, the final balance was collected in person and they couldn’t seem to get the correct amount nailed down. That is until I pulled it up on my phone and showed them directly.
Again, you’re going to want paper hard copies and something digital saved on your phone.
Visa
Visas are required for all US citizens traveling to Tanzania. Foreign nationals may apply for a visa online in advance of travel HERE. US citizens may also obtain a tourist visa upon arrival at the airport in Tanzania but due to recent changes in the process, I wouldn’t.
I purchased my visa in the airport upon arrival. The changes took effect like a week after I arrived. It was quick when I went but can now take up to three hours. Apply online.
The online process usually takes two to three weeks. If you’re from the US it will cost you $100. Non-US nationals? Only $50. Yea…
Immunization Documents
Yellow Fever Vaccination Card This depends on where you’re coming from. If you’re arriving in Tanzania from the US or somewhere similar, you’re in the clear. Anywhere else? Maybe not, so be sure to check.
It’s only required when you are coming from an active Yellow Fever country.
If you’re planning on visiting Kenya first, you’ll have to get the vaccination. Just a layover in Kenya? You’re safe. But if you leave the airport for even a minute, you’ll need it.
I tried getting this vaccine in the US before leaving but it was expensive (several hundred) and only offered in a very limited number of specialty clinics. Trying to avoid going into NYC, I called around fifteen different places that the internet claimed offered it.
I ended up skipping it. If you’d like though, you can get it at the airport in Tanzania for $50 USD. In retrospect, I wish I had just gotten it there.
Hepatitis A & B While not checked or required, these were suggested so I got them from my general practitioner when I went to get a prescription for malaria medication.
I was going to skip these too but the doctor said I may as well since it would be covered by my insurance. Doctors love giving vaccines.
Insurance Information
World Nomads Get. Travel. Insurance.
I used World Nomads. Both the Standard policy and Explorer policy cover high altitude trekking up to altitudes of 6,000 meters and 7,000 meters. Kilimanjaro is 5,895 meters at the summit.
Normally, I use their Standard policy but for Kilimanjaro, I got the Explorer. Emergency evacuations can be expensive, especially if a helicopter is required and I heard quite a few birds over the course of my trek.
Writing Utensil and Paper
Rite in the Rain All-Weather Pen This pen writes through water, grease, and mud without clumping or smearing. It’s also pressurized so it can write in temperatures from -30F to 250F, underwater (up to 35 ft), and at any angle.
Why would you include a pen on a Kilimanjaro gear list? Well, you probably won’t need it. You will be signing in at every camp and there are pens there, but you never know.
I list a pen as part of my general essential travel gear because have you ever experienced the feeling of needing to write down something important but having nothing to write with?
It’s such a frustrating and helpless feeling. At less than half an ounce, this will save you from trying to scratch numbers onto a piece of paper with your knife. Yes, I’m speaking from experience… Oh, look! Yet another reason to carry a knife!
I also brought a few pages from a miniature Rite in the Rain Weatherproof Top-Spiral Notebook. I never needed them, but sometimes it’s nice to be able to jot something down. The full notebook is small and only 3″x5″ but bringing it all is overkill unless you’re planning on playing a game or something of the sort.
Mount Kilimanjaro gear list complete!
I hope you find my Kilimanjaro gear list to be helpful. I’ve included a downloadable .PDF file that contains the entire list on a single page. With checkboxes for your convenience, you’ll be able to tick off items as you get them without ever having to wonder if you do or do not still need something.
Have fun and “enjoy” summit night!
Download: MOUNT KILIMANJARO GEAR LIST PDF
Is there anything you would bring that I didn’t mention? Let me know what else would go on your Mount Kilimanjaro gear list in the comments below!
DID YOU ENJOY THIS ARTICLE? PIN IT!

[…] fact, between your operator, flights, and the mile-high pile of gear you need to climb Kilimanjaro, the price can be prohibitively […]
Do you know what the spf rating of the long sleeve shirts is? I also burn easily and could use those bad boys while hiking out in California or at work even.
Hey, good question. Clothing uses a rating called UPF instead of SPF which is for sunscreen. The Omnishade technology is rated at UPF 50 which blocks 98 percent of the sun’s rays and allows only two percent (1/50th) to penetrate. For comparison, a regular cotton t-shirt is only rated at UPF 5.
Excellent list, love the way you present both technical information and also your opinions on gear. Looking forward to more gear lists!
Thanks! Yea, too many gear lists are too cut and dry. I like knowing why things are needed and what purpose they’ll serve.
[…] you bring, remember that it stands a high probability of being crushed to bits in your bag… like my Cheez-Its on Mount Kilimanjaro that I had to eat with a […]
This has to be the most in-depth list for Kilimanjaro I’ve found. Thank you for this! I’m going with a group this year to hike the mountain and I want to make sure I am 100% prepared. This will be the toughest hike I have done. Do you know if there is a malaria vaccine option or if I will need the medication? I heard the same thing you mentioned, that it can be a bad experience. I’ve never been to Africa so I know I have to get my body prepared for everything.
You’re welcome! I hope it helps! Yes, there is a malaria vaccine that they have been working on for around thirty years but the recommendation by the WHO for large-scale use is relatively new. Scientists hail historic malaria vaccine approval They’re targeting it for people who actually live in the malaria areas fulltime so I’d probably stick with the pills for now as you won’t need to take them for the entire trek.
[…] my own fault. The course itself currently comes in at $1,345 which isn’t that much, but like with Kilimanjaro, the gear list for this climb was a mile long, and while there was some overlap in terms of what I […]
[…] mountaineering requires more than just the gear I used on Kilimanjaro. Things also needed to be more specialized now as well, because there is no porter to carry a bag […]